Wednesday, 19 December 2012
Wednesday, 5 December 2012
What I need to do next
The next scene of my music video will be at the beach on a winters day, below is a list of things i need to do to prepare for the next scene.
- I need to get all the boys together to decide a time and date to go to the beach
- I need to think of transport, how we will all get to the beach
- I need to think about what costume i would like my characters to wear for this scene
- I need to think about if i need any other props or characters for the next scene
- Because a lot of the next scene is instrumental and not much singing i need to think about what i want the characters to be doing while they aren't singing.
- Linking back to my audience feedback, i need to think about how i am going to use a bigger variety of shots and how i am going to make the characters make more eye contact with the camera.
Audience Feedback
I showed my music video to a number of people in my class and asked them to give me feedback on my video so far and this is what they came up with.
Positive Feedback:
Positive Feedback:
- Very good lip syncing
- Good variety of shots, variety of angles
- Very good costume
- Costume and props represent the genre well
- Clear boyband genre
- Very good eye contact with the camera
- Good emotional facial expressions
- Stuck the the boyband genre well
- Very good framing in most of the shots
- The sepia and black and white effects work well
- Good transitions between shots
Negative Feedback:
- Need more locations
- More variety in the length of shots. e.g. extreme close up, long shot
- Framing is poor in some of the shots. e.g. cutting half of the character off
- More eye contact with the camera would be better
- Get the characters to do more, not just sit and sing
I will take all this feedback on board and take it into account when i go out to film the next scene of my music video.
Tuesday, 4 December 2012
Tuesday, 20 November 2012
Equipment I will use to make my music video


The pictures to the left and right show an apple macbook and an apple mac computer. These will be vital pieces of equipment when creating my music video because they have the editing soft wear. They both have soft wear such as Photoshop and iMovie which is what i will be using to create and edit my music video. You can get iMovie and Photoshop on standard windows computers but it costs more and doesnt work as effectively.

 Here is a picture of the video camera i will be using to film my music video. It is a standard Panosonic video recorder. I will be using this video camera because it is very simple to use and you can easily upload your recorded footage through the memory card it uses. The camera has good memory storage so it allows you to try out and be as creative with as many different shots as you like and it also has a very good picture quality which is key for a good quality music video.
Friday, 16 November 2012
Where I am going to film my music video - Location shots
I did some research on classic boyband music videos of bands such as Take That, Westlife and Boyzone and i looked to see what sort of locations they would be using. Below are the most common locations for a boyband music video.
The Beach

.jpg)

Recording Studio/small room

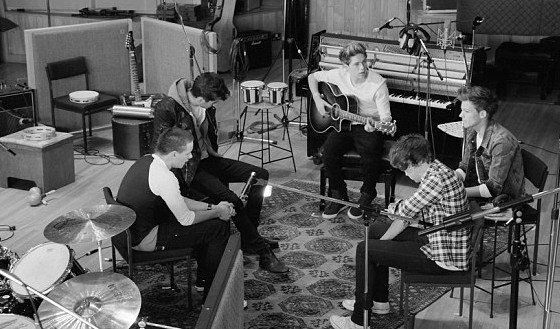

My research showed that the most common locations for a boyband music video were scenic areas such as beaches and small, close, recording studios or empty stages. To follow these conventions i knew i had to film my music video in these sort of locations, below are some pictures of where i am going to film my music video.

Wednesday, 7 November 2012
How I upload and edit videos

- Plug the firewire into the camera and computer
- Open iMovie on the computer
- Find the point on the camera where you want to start uploading
- Click import and wait for your video to import onto the computer from the camera
- Once the video has imported too iMovie you can cut away the points of the video you don't need.
- Once you are happy with the clip you have you can move the clip into the editing part of iMovie and edit the clip by adding sounds and effects
- Once you are happy with the final clip you upload the clip to Youtube
- You then find the clip on Youtube and you can embed the clip onto your blog from there.


Prelim Filming
Evaluation and feedback of Prelim filming
After going out and doing some preliminary filming i have learned a lot about filming and different techniques of filming and editing. The prelim filming has showed me how many shots i need when just filming a simple sequence of someone getting into a car for example. Firstly i just filmed the actor walking straight to the car and driving off with no variation of shots at all and it just looked very poor and boring so i did it all again putting in a much larger variation of shots, including a panning shot, close up, long shots, still shots and mid shots and the video looked much better straight away. I also learned a lot more about editing the video and how hard it is to cut off the video at the write points. At a few points in my video the change from one shot to another isn't at the right point or it isn't as clean as i would like it to be. Also at a few point in the film the camera was slightly shaky which wont be good in my proper music video. I can easily fix these problems through practicing editing on iMovie, doing more prelim filming, and i can ave the use of a tripod to keep my shots steady.
I have shown some people in my class my prelim filming and they gave me some feedback, they said:
- Good variation of shots
- well edited in places
- could be edited better in places
- could put some sound in to go with the video
- camera shaky in places
Tuesday, 6 November 2012
Audience Feedback
Evaluation of feedback
This audience feedback has been very useful because the people feeding back are part of my target audience so it is good to get their views and ideas on my project. The general feedback was that my idea was clearly shown through my planning stages and that the idea is progressing nicely. They also mentioned that my costume and props will represent my genre well.
Evaluation of filming the feedback
I can also evaluate my filming techniques from this video. I have learned that when i come to film my music video i need to ensure the area is quite from any background noise because that has overpowered the voice of the person speaking a few times in this video. I also need to ensure i have a clear background when filming, because in these shots there are posters and pictures in the background which can easily draw the attention away from the speaker. I have also learned a lot about editing while making this audience feedback, i have learned how to add effects and how to add texts, a few of the effects i have added in haven't worked as well as i thought, they haven't been as clean as i would have liked, but i can learn from this and ensure i add the effects in correctly when making my music video.
Monday, 5 November 2012
Who are my target audience? - Customer Profiles
Before creating my music video i needed to find out who my target audience would be because i needed to aim my music video at them. to find this out i researched what demographic was buying concert tickets and the albums of already well known boybands such as Take That, Westlife, Boyzone and One Direction. The research showed that it was strongly females that were buying these albums and tickets, mainly older women for bands such as Take That and Westlife, but also alot of younger girls. But for bands such as One Direction and The Wanted it is mainly young girls with a smaller amount of boys. Below is a list of customer profiles of the sort of people i would be aiming my music video to.
 This is Rachael, aged 17.
Rachael would be attracted to my music video for many reasons. She will find my boyband members attractive which will make her want to watch the music video because she will want to see them make eye contact with her and make it seem as if they are singing to her. She, like most teenage girls like to be romantic and emotional so she would feel that the romantic boyband genre of the song would really relate to her on a personal level. She also likes locations such as the beach which is a location of my music video and she is into fashion and style, which all of my band members have.
 This is Nicola aged 38.
Nicola will also be part of my main target audience for many reasons. Mainly because classic bands such as Take That and Westlife were in their prime when she was a teenager so she will like boyband style music because it will bring her back to her younger years. Like Rachael, she will also find the band members attractive which will draw her in and she will like the emotional music. She will look up to the band members as 'ideal husband' material.

This is Josh aged 17.
He will also be part of my target audience, but for different reasons than the two females. Josh will look up to my band members and inspire to be them. He will see them as the perfect men because all the girls will love them and fancy them he will want to be like them too. He will copy their style and try and be like them.
This is Rachael, aged 17.Rachael would be attracted to my music video for many reasons. She will find my boyband members attractive which will make her want to watch the music video because she will want to see them make eye contact with her and make it seem as if they are singing to her. She, like most teenage girls like to be romantic and emotional so she would feel that the romantic boyband genre of the song would really relate to her on a personal level. She also likes locations such as the beach which is a location of my music video and she is into fashion and style, which all of my band members have.
This is Nicola aged 38.Nicola will also be part of my main target audience for many reasons. Mainly because classic bands such as Take That and Westlife were in their prime when she was a teenager so she will like boyband style music because it will bring her back to her younger years. Like Rachael, she will also find the band members attractive which will draw her in and she will like the emotional music. She will look up to the band members as 'ideal husband' material.
This is Josh aged 17.
He will also be part of my target audience, but for different reasons than the two females. Josh will look up to my band members and inspire to be them. He will see them as the perfect men because all the girls will love them and fancy them he will want to be like them too. He will copy their style and try and be like them.
Wednesday, 17 October 2012
Mince's top tips - Filming
Camera stance when moving:
- Hold tightly onto the camera and find the record button
- Elbows tucked in for stability
- Someone behind you holding you for support and stability
- Always practise shots before you film
- Direct the actors to save film, eg. markings on the floor, learn the song well
- Count down
- Always film more footage than you need as you can always edit and cut away film
I can practise these filming tips when doing my prelim filming and i hope to apply them fully when filming proper music video.
 After reviewing these filming tips i went out with a camera and a few of my classmates and practised different filming techniques and poses and practised directing my actors around to practise things like timing when singing and walking, zooming in and out on the camera, lighting and sound. Below are some pictures of what we did.


- Hold tightly onto the camera and find the record button
- Elbows tucked in for stability
- Someone behind you holding you for support and stability
- Always practise shots before you film
- Direct the actors to save film, eg. markings on the floor, learn the song well
- Count down
- Always film more footage than you need as you can always edit and cut away film
I can practise these filming tips when doing my prelim filming and i hope to apply them fully when filming proper music video.


Wednesday, 10 October 2012
My Mood Board

I have posted a picture of the mood board i created as part of my planning and preparation for my music video. I have used pictures of the sort of location i would like to use on my music video, very scenic areas like mountains and beaches are conventions of a boy band music video so i have added those pictures to my mood board. I also have pictures of close ups of musical instruments and a man singing because after doing my research i have realised close ups of musical instruments and people singing is another convention of a music video. I have also added pictures of the sort of costume and props i would like my cast to wear to help represent the genre of music i am going for. I have also added key words like, emotional, boy band, love and happiness around my mood board, the lyrics to the song i am making a music video to are also on my mood board.
Presenting my ideas

Here is a picture of me presenting my ideas to the class using a mood board. Overall the class thought the genre was clear from my mood board and that my idea would work well. They thought the song choice was good and my costume and props ideas represented the genre well. They also said that I will need to make sure I make my story line a lot clearer and make sure I have a clear beginning, middle and end. It was good to present my ideas to the class as they are all between the ages of 17 and 18, which is part of my target audience so their feedback is very useful.
Wednesday, 3 October 2012
Risk Assessment
Location
|
Risk
|
Solution
|
The Stage
|
Someone can slip and fall
off the edge of the stage
|
Put brightly coloured tape
along the edge of the stage. Put soft mats on the floor under the stage.
|
The Stage
|
Someone could fall off the
stool when singing
|
Make sure all the stools
are stable. Put soft mats underneath the stools
|
The Beach
|
Someone could slip and hit
their head on a rock
|
Wear suitable shoes and be
careful when walking along the stones
|
The Beach
|
Someone could down in the
sea
|
Make sure people stay well
away from the sea and be sensible when around the sea
|
The Beach
|
When the band are throwing stones
into the sea, a stone could be thrown at someone by accident
|
Make sure the path of the
stone is completely clear and make sure there are no people around when
filming that shot
|
The Cliffs
|
Someone could fall off the
edge of the cliff
|
Make it very clear where
the edge of the cliff is and make sure people stay well away from the edge
|
The Cliffs
|
Somebody could slip and hit
their head while walking up the cliff
|
Find a clear and safe path
to the top of the cliffs and ensure the bad are wearing suitable shoes
|
Thursday, 27 September 2012
Wednesday, 26 September 2012
Cast and Filming Schedule
Filming Schedule
I will go out and film Every Wednesday from 1:10 until 3:30
I will go out and film Every Wednesday from 1:10 until 3:30
My Song Choice
Monday, 24 September 2012
Which song to use for my Music Video
Here are a selection of songs that i am thinking of using for my music video.
You Raise Me Up - Westlife
Love Sick - Loveable Rogues
Rule The World - Take That
What Makes You Beautiful - One Direction
Conventions of a Music video
Thursday, 20 September 2012
Idea Change
After doing some research into short films i have decided to completely change my plans and create a music video instead of a short film. I have done this because after doing some research into music videos i think i have bigger and better ideas and a music video would work better for me. I now need to start my planning process again looking into the conventions of a typical music video and try and decide on what song i would like to use for the video.
Tuesday, 18 September 2012

Monday, 17 September 2012
image deconstructions
 This is a black and white image of a bearded man smoking a cigar. i like this image because i like how the photographer has managed to make the man look important, i like the way he is looking over at something, like he is in charge and making sure things are being done correctly. The big cigar also makes the man look important, like he is in the mafia or something like that.
 This is a picture of some children playing up on a very high wall. i like this picture because i like how the photographer captures the fearlessness of the children, how they are really high up on a tiny old wall but they are still having fun. Its looks like they are quite poor children trying to make their own entertainment by living dangerously.
 This is a picture of two horses running along the shore of a beach. i like this picture because the photographer really captures how fast the horses are moving by making them sort of blury. i like how the horses have left a trail in the sea and i also like the reflection of them on the water infront of them.
Sunday, 16 September 2012
Conventions of a horror film
Conventions of a genre - Horror
Characters:
- The bad guy - usually a mad serial killer, monster or alien.
- The main character - usually survives and ends up being the hero
- His dumb, know it all friend that thinks he knows best but then just ends up getting killed
- The attractive young woman with her breasts out all of the time
- Police man - can either be a good or bad character, but will always die.
Props and Locations:
- If the movie is a teen, slasher horror movie then it is usually set in one of their houses. for example they could be having a house party and the bad guy comes and kills them
- Another frequent locations would be run down areas in the middle of nowhere, this is because the people would be stranded there with noone to help them, so it would be a good chance for the killer to strike. eg. '40 days of night' 'the thing'
- The killer would usually be either, disguised in black clothing so noone can see his face, dressed up as a normal person or policeman so noone would expect it to be them or wouldnt dress up at all so again noone would expect it to be them.
Short Film
Tuesday, 3 July 2012
Tips for A2 short film making
· Title sequences: Students need to think carefully about the title of the film and how you can cleverly incorporate it in to your sequence. How many titles do you show? Be aware of the pacing and what the sequence is serving, is it narrative or stylistic, and are the titles part of the look? (Panic Room, Se7en) Do the titles start immediately or do they come in after big opening sequence (Raiders). Think carefully about the colour and tone of the sequence, what colour should the titles be? Are they editorial punctuation marks (white against black) or do they sit in the environment seamlessly? Think about how the music is used in the sequence.Is it a sound design or composed track? Original music is always better. Try and record ambient sound effects using the camera to layer up the sequence. Sound is 50% of the experience. Think carefully about the use of editing; are you composing an exciting and energetic opening with jarring cuts and snatched moments, or are you building up questions and suspense with lingering moody shots and ambiguous images? Understand your tone and mood and shoot with that clearly in mind. Don’t rely on ‘the edit’ to sort everything. Shoot for the edit and you will have a richer and fuller experience with many more options.
- Short film tips: Remember it is a short film and the idea can be very simple. Try to write from some form of experience. Try to use events or situations you have experienced to draw upon. It may just be a thought or a sensation; the closer you are to it the more authentic it will feel. Rewrite, rewrite and rewrite again.Make sure your script is absolutely nailed before you start storyboarding. Know your story and know your characters. Keep your story authentic and your setting authentic. You want your audience to believe in your characters and your ‘world’.
· . Do not try to remake Star Wars or some other big blockbuster. It’s all about the story first. Think carefully about what genre your story is in and then utilise that genre’s conventions to maximise the film’s effect A great idea/story shot simply is far more effective than a competently shot piece with a mediocre concept. Storyboard your shots and ideas out, and try to do a paper edit. Even go as far as to film your storyboard and do an animatic with basic sound effects to get a feel for the pacing and story progression. Try tocast properly with people who want to do it, not friends under duress. Get some time with the cast so they have some time to work out their approach. Workshop with them if you get time.Research your locations carefully. Make realistic choices and scout the location at the time you are likely to shoot, to know about traffic noise and other obstacles that may not be initially apparent. Try to keep your locations close together, so as not to waste shooting time travelling to all the different places. Think about power outlets and ways of lighting and powering your location. How accessible is your location, can a car get there with your equipment? Feeding your cast and crew – very important. An army marches on its stomach. What props do you need and are they easily accessible? Break down your story into scenes and make sure you have all the props you need for each scene in advance. Don’t leave things to chance. Create a shooting list of shots from these broken down scenes and have them in order of priority.Expect to lose some shots as your shooting day progresses; things always go wrong. If you have storyboarded it well you will easily know which shots you can afford to lose and the ones you MUST get! Be realistic about what you can shoot in a day. Better to have 10 very well crafted shots than 20 barely acceptable ones. You will never use them. Learn your camera equipment. Try to go fully manual mode if you feel confident. It will create a more professional look and the shots will have more continuity. Play with DOP (depth of field) in camera, a longer lens will make the background fall out of focus and draws the eye to your in-focus subject...it also looks very filmic! Use a tripod and have clear steady movements when panning. Go handheld if the idea requires that immediacy and twitchy feel. Think about your background when you are framing up your shots, don’t put something hugely distracting behind your characters unless there is a story reason to do so.
- . Consider your framing carefully, what are you trying to convey to the viewer.Wide establishing master shot will help your viewer understand the environment and placement of people. Then actively go in tighter and tighter to grab your details. However, think about how much information you want your viewer to have access to. Are you hiding stuff from them on purpose for dramatic effect? Would a tight ambiguous shot be more in keeping with your approach? These are important questions for students to ask themselves. Play around with different lens sizes, but remember the more you zoom your lens the more unstable it looks, with every movement amplified. Use a tripod to help you achieve stability. The wider the lens the more in focus the whole shot will be, the longer the lens the shallower the DOP. Try to get your sound as clear as possible and remember you can re-record later if desperate. Dodgy sound lets a film down, no matter how great the pictures look. Always record ‘wild tracks’ in each location so your scenes have continuity in sound as well as pictures. Also worth recording extra sound effectson a subsequent day if your shoot day is very rushed.
- When editing, try to do a very rough assembly first; do not get bogged down by fine cutting little bits at a time. You always need to see the bigger picture and how each scene works against the others. Imagine the edit from a profile view, where are the peaks and troughs pacing wise, when does it slow down in your head, and then when does it pick up pace and race along? Your edit might not reflect what you had originally imagined but that is absolutely ok. Keep the edit as lean as you can. Short films have no fat. Everything in the film must push the story forward. You make the film 3 times: Once when you write it, then again when you shoot it and finally when you edit it. It will evolve and that is ok. As long as decisions are clearly explained then it’s all relevant and valid. You need to let the rushes tell their story. Spend a good deal of time on the sound; it is 50% of the film watching experience. Re-record dialogue if it sounds too rough. Go out and get extra sound effects to fill your audio space. Sound design can be as involved as the picture cut so make time for it. Think carefully about your use of music and where it lies in your film. Usually less is more!
Tuesday, 12 June 2012
Briefs
There are two briefs that I can chose from for my year 13 media course. The first brief is:
Create a promotion package for the release of an album, to include a music promo video, together with two of the following three options:
- a website homepage for the band
- a cover for its release on DVD
- a magazine advertisement for the DVD
The second brief is:
Create a short film in its entirety, lasting approximately five minutes, which may be live action or animated or a combination of both, together with two of the following three options:
- a poster for the film
- a radio trailer for the film
- a film magazine review page featuring the film
Each of these briefs must include the 5 linked theories which are:
- Genre
- Narrative
- Representation
- Audience
- Media Language
Subscribe to:
Comments (Atom)